Today I’ll be showing you how to save seeds from your garden. Collect the seeds from your garden and you’ll be able to save them for the next season. There are many advantages to saving your own seeds. You’ll save money because you won’t have to buy new seeds.
You’ll know exactly where your seeds came from and you’ll even have the opportunity to share seeds with some of your fellow gardeners. I like to begin separating seeds first by laying out a sheet of newspaper to help clean up any scraps afterwards and then a nice clean sheet of white paper so that I can see the seeds very clearly.
To begin, place your seeds on your white sheet of paper. Some seeds like these dill seeds are very easy to separate. You just take the ends, pull off these little seeds and drop them right on to the sheet of paper. You can see that these are very easy to identify. Cilantro seeds are also very easy to collect.
The seeds are at the tip of the plant where the flowers normally go and like dill seeds you just pull off the individual seeds and drop them on the paper. For seeds in dried pods it’s a simple matter of just taking the pod like in these radishes. I like to use my thumbnails and pull apart the pods and then get to the seeds on the inside and you’ll see the seeds are usually a completely different color than the rest of the pod.
You can also just crumble the pod try to obliterate it and then afterwards you can in and separate the individual seeds from the chaff. Seed pods like these green beans are similar but much easier. Just crack open and you’ll easily see all the dried beans inside. For plants with smaller seeds it’s a little more difficult but still basically the same concept.
These basil plants have the seeds inside each of these dried flower clusters. What I like to do is just separate the stem from the old dried flowers, put them on to the paper and you’ll be able to see the seeds, and so at this point you just separate the seeds from the dried flower. The seeds are much smaller and it takes a little more time to separate them.
Use a pencil or a knife or spoon but some tool and you can see the little seeds and just gradually separate them out and you want to discard all these dried pieces to save just the seeds. Another method that works pretty well is to actually separate the seeds and the stalks and the dried flowers into a colander.
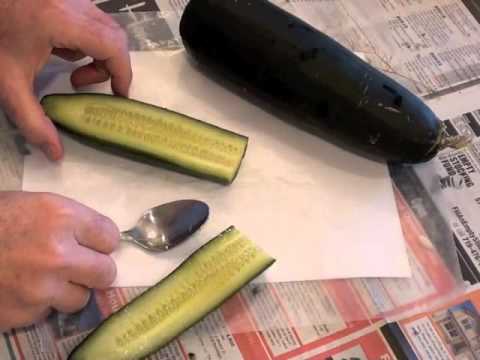
Shake it a little bit and you’ll see that the seeds and just a little bit of the chaff will fall through the holes. This could make it much easier to separate out these little dark seeds. With plants like zucchinis and cucumbers you want to cut them open and then spoon out the inside. Once you’ve spooned out the inside on a sheet of wax paper, then you can begin to separate the seeds and lay them out to dry.
Try to separate the seeds as evenly as possible and then throw away the rest of this pulp. You’ll always want your seeds dry before you save them. These pumpkin seeds like cucumbers start off very wet but after a few days of drying they’re ready to move towards saving. They’ll be covered with a membrane.
All you need to do is just squeeze the pumpkin seed and the membrane will come right off. That’s one reason why you don’t need to worry so much about cleaning the cucumbers and the pumpkin seeds in the beginning because the membrane will separate easily from the dried seed. For peppers you’ll want to cut them in half or just break them apart.
Collect the seeds from just beneath the skin. You could use a knife or a spoon but I find it just as easy to use my fingers to separate the seeds lay them out on your paper and set them aside to dry. For tomatoes, cut the tomato in half and then scoop or scrape all the seeds out of the middle. This works for both small tomatoes and large tomatoes.
Once all the seeds are in your container take about half a cup of water add it to the mix stir to combine and then set it aside for a couple days. After two or three days, you may notice a scum developing on the top of the tomato seeds. This is exactly what you want. This shows that fermentation is taking place and that the seeds are separating from the gel that surrounds them.
At this point they’re ready to clean off and dry out Carefully pour or spoon off a scum and any big pieces of tomato that remain. The seeds should sink to the bottom. You want to make sure you don’t lose any of them during this part of the process. Once you have most of the scum and the solid pieces cleared away, pour the container into a sieve and pour the rest of the seeds and the water into it.
Now, what you’ll want to do is just rinse off the seeds. All the seeds are still in the sieve you have an opportunity to remove any skins or large pieces of pulp that might remain. Now that the seeds have been rinsed and cleaned, go ahead and spread them on a piece of wax paper. You want to let these dry for a couple days so spread them out so that air can get to each of these seeds and gradually dry them After a day the tomato seeds will have dried enough that you can separate any of the little clumps of seeds that may have developed when they were wet.
Separate the clumps as much as you can and spread the seeds out to continue drying. Now that you’ve separated your seeds you’re ready to save them you can use special seed packets that you buy for the purpose of saving seeds. Just as easily you can use an envelope. I like to use jars it’s easy to see what’s inside there’s lots of jars around the house and they’re reusable.
When you’re ready to store your seeds all you need to do is just take the paper and then drop the seeds into your container. Once you’ve put the seeds into your container it’s time to store them. You want to make sure that your container stays dry particularly for seeds that started off pretty wet I’ll use a desiccant packet like you sometimes get in electronic boxes and I’ll put it in the jar when it comes time to store.
Make sure your container is labeled. I like to add the year that I save the seeds because not all seeds will last forever. Store your seeds in a cool dry location and they’ll be ready to use again in the next growing season. And that’s how you save seeds that you’ve collected. If you have any questions, please comment.